KVM/Libvirt VM Orchestration
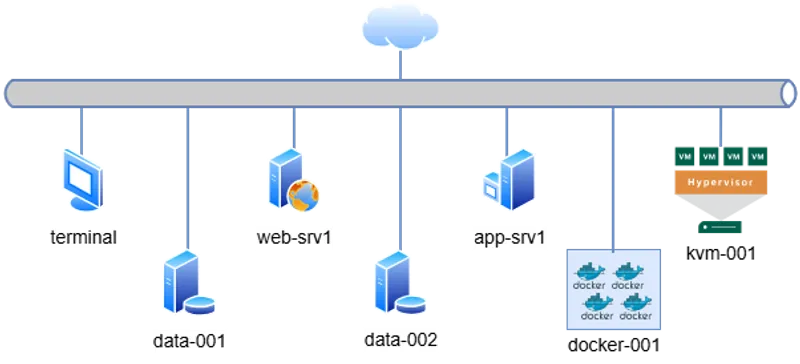
Access via SSH from the default terminal. The cluster topology is defined below:
# Management & Controller
10.0.0.15   terminal       # Main Entry Point

# Web & Application Tier
10.0.0.60   web-srv1   # Nginx / Apache
10.0.0.70   app-srv1    # Backend App

# Data Persistence Tier
10.0.0.80   data-001    # Primary DB
10.0.0.90   data-002    # Replica / Backup

# Virtualization & Containers
10.0.0.100  kvm-001        # Libvirt Hypervisor
10.0.0.110  docker-001     # Container Runtime
terminal to target IPs.
📋 Engineering Requirements
Section titled “📋 Engineering Requirements”Business Context:
The QA team requests a dedicated, isolated compute instance on the kvm-001 hypervisor for integration testing. The environment must be provisioned using standard CLI tools to ensure reproducibility.
Technical Objectives:
- Host Readiness: Validate the
qemu-kvmandlibvirtdstack status. - Storage: Provision a 10 GiB
qcow2volume (Thin Provisioned) namedqa-vm-disk.qcow2. - Instance Definition (
qa-vm01):- Specs: 1 vCPU, 1024 MiB RAM.
- Network: Default NAT bridge.
- Console: Serial redirection (Headless mode).
- Lifecycle: Enable auto-start on boot and perform a graceful shutdown test.
🔧 Implementation Procedure
Section titled “🔧 Implementation Procedure”-
Access Hypervisor Node
Connect to the virtualization host.
Ventana de terminal ssh kvm-001 -
Verify Host Prerequisites
Ensure the libvirt daemon is active and enabled.
Ventana de terminal sudo systemctl is-active libvirtd# If inactive: sudo systemctl enable --now libvirtd -
Provision Storage Volume
Create the virtual disk using
qemu-img.Ventana de terminal sudo qemu-img create -f qcow2 /var/lib/libvirt/images/qa-vm-disk.qcow2 10G -
Define and Boot Instance
Execute
virt-installwith parameters for a headless environment (--graphics none).Ventana de terminal sudo virt-install \--name qa-vm01 \--ram 1024 \--vcpus 1 \--disk path=/var/lib/libvirt/images/qa-vm-disk.qcow2,format=qcow2 \--os-variant rocky9 \--network network=default \--graphics none \--console pty,target_type=serial \--location "https://download.rockylinux.org/pub/rocky/9/BaseOS/x86_64/os/" \--extra-args "console=ttyS0"Tip: To detach from the console without killing the VM, press
Ctrl + ]. -
Configure Autostart
Ensure the VM survives host reboots.
Ventana de terminal sudo virsh autostart qa-vm01 -
Validate Lifecycle Control
Verify the VM is running, then request an ACPI shutdown.
Ventana de terminal # Check statussudo virsh list --all# Graceful shutdown requestsudo virsh shutdown qa-vm01
🔍 Troubleshooting
Section titled “🔍 Troubleshooting”- “Guest name already in use”: If a previous attempt failed partially, clean up the metadata:
Ventana de terminal sudo virsh destroy qa-vm01sudo virsh undefine qa-vm01 - Console Hanging: If the console does not show output, ensure
--extra-args "console=ttyS0"was passed correctly to redirect kernel logs to the serial port.